After you’ve configured the Enterprise’s Line Settings, Dialing Properties, Email settings, and Routing Type settings (see Automatic Routing and PBX System Integration) be sure to send and receive at least one test fax to confirm the Enterprise is operational. Once you’ve successfully sent and received a test fax, you’ll next create and configure new Enterprise users according to Creating FaxPress Enterprise User and Group Accounts.
To send and receive the test fax, you’ll use the Enterprise’s Administrator account, one of three generic user accounts already created for you. The other two are the Unaddressed account and the Guest account. By default, the Enterprise directs all incoming faxes to theUnaddressed mailbox. All of these generic user accounts or mailboxes are initially configured with no password as the default. You can assign a password to the Unaddressed and the Administrator Mailboxes the first time you login to your FaxPress Enterprise.
To send a fax using the Administrator account, follow these steps:
| 1. | Log in as Administrator to FaxPress Plus. |
| 2. | Select the Compose button from the FaxPress Plus menu bar to open the Send Fax window. |
| 3. | Type the phone number of an external fax machine directly into the To field, enter a Subject, enter a message in the message field, then select the Other button. The Other button will allow you to send your test fax to the Administrator account, and receive and open the test fax from the Administrator mailbox’s Incoming Faxes Queue. |
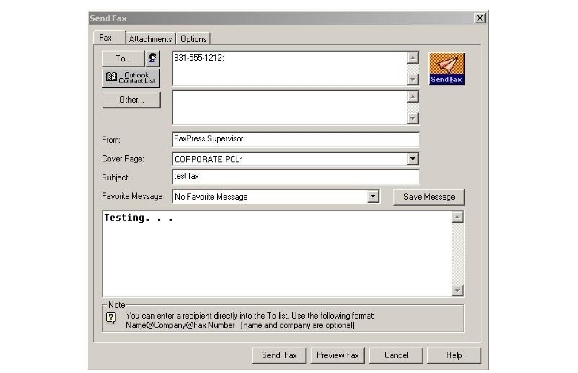
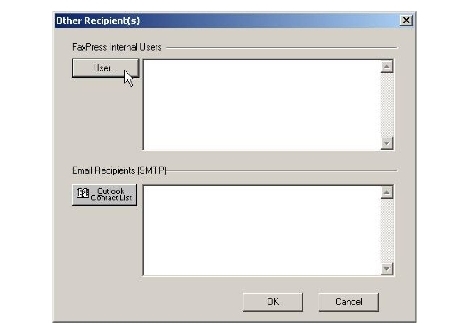
| 4. | The Other button opens the Other Recipients window. Click the User button. |
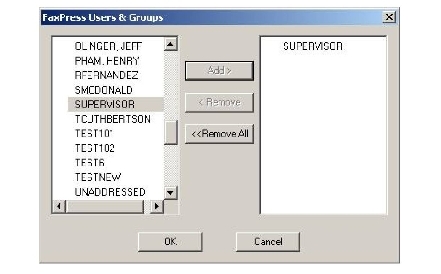
| 5. | Select Administrator from the list of FaxPress Users & Groups, then click Add and OK. |
| 6. | Select one of the Send Fax buttons. If the Send Fax button in the upper right hand corner is displayed in black and white rather than color, additional information in either the address, subject, or message fields is required to send your fax. If you are attaching a file, the only required field for sending a fax is the fax phone number. If you are not attaching a file, you must, at minimum, include a cover page and message. |

When the Send Fax icon is displayed in color, all the required information is available and the fax is ready to send. Active outgoing fax jobs cannot be cancelled once sent.
![]()
Next, see Receiving a Test Fax to confirm the FaxPress Enterprise is operational.
The FaxPress Enterprise automatically provides an electronic fax confirmation notice for each fax sent, and can also be configured to provide printed fax confirmation notices as well.
Electronic fax confirmation notices will automatically appear in the Notices folder of the Mailbox after each fax, and will indicate whether the fax transmission was successful or not. Double-click the individual notices for transmission details.

Additional electronic confirmation notices can also be configured using TrayFaxAlert. For more information on confirmation notices and TrayFaxAlert, see Notices and Alerts in the User Guide.
If you’re using one of the FaxPress Enterprise Email Gateway options, electronic fax confirmation notices will automatically arrive via email after each fax transmission. See the FaxPress Enterprise Email Gateway Guide for more information.
Printed fax confirmation options include automatically printing a confirmation notice, or printing a confirmation notice plus a copy of the outgoing fax. Printed fax confirmation options can be configured either in the Outgoing Faxes tab of the User Properties (see Setting Outgoing Fax Properties of this Guide), or the Other tab in the Send Fax interface (see Sending Faxes in the FaxPress Enterprise User Guide.)
About the Outgoing Fax Queue and Fax Status
The FaxPress Enterprise’s Outgoing Fax Queue includes the Personal Faxes Only folder, displaying faxes specific to the account you’re logged into, and the All Faxes folder, displaying all outbound faxes.
Faxes can be sorted by Sequence Number, Date & Time, Destination, Company, Source and Status. Fax Status categories include: Queued, Ready, Active, Delayed, Held, Approval Required, Sent, Failed and Retry.
For fax processing efficiency, the FaxPress Enterprise’s fax board service is designed to cache up to two fax jobs per fax line when necessary. For this reason, the faxes identified as Active will include the fax jobs actually in process, plus any additional faxes in the fax board’s cache.
This means that the number of Active faxes can be up to twice the number of the unit’s lines. For instance, the 4-line unit in the example below displays eight active faxes rather than the four active faxes you might expect for a 4-line unit.
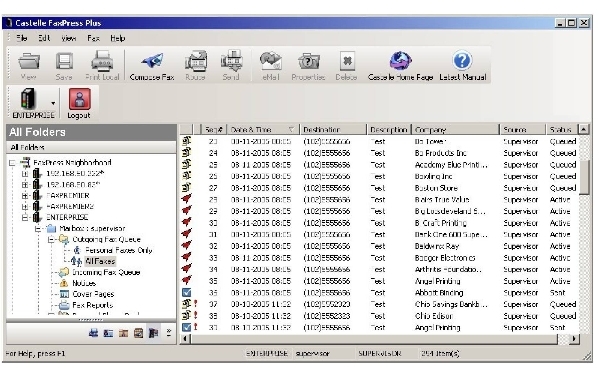
Right-clicking on an outgoing fax job provides access to a number of options. The fax may be viewed, printed, saved, resent, deleted, held, sequenced, emailed, approved (if awaiting approval) or faxed immediately. Selecting the Properties option provides additional job information such as the number of attempts, the specified retry limit, and the retry interval settings.
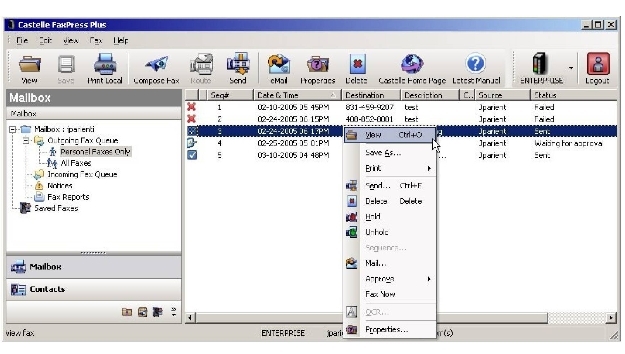
For additional, detailed information on the Outgoing Fax Queue context menu options, see Outgoing Fax Queue in the FaxPress Enterprise User Guide.
|
FaxPress Enterprise & Enterprise Redundant WebHelp
Last Updated: 11/1/2007
E-mail this page |
Castelle 855 Jarvis Drive, Suite 100 Morgan Hill, CA 95037 Toll-free 800.289.7555 Tel 408.852.8000 Fax 408.852.8100 |